Saturday, November 23, 2013

Pop Up Card...in a Box - Club Project #2

This was our second project at club this week.  I took inspiration from Monica Vale and she so graciously tried to share her measurements with me but they were all in cm's and even with my wonderful math-skills(!) they didn't convert the same...did you know that UK cardstock is even a different size than here?!  So I include my measurements below and many thanks to Monica for the inspiration:)

Rough dimensions & meaurements (in inches):
- start with a full piece of cardstock (baked brown sugar)...score (landscape) at 2 5/8, 5 1/4, 7 7/8 and 10 1/2
- turn (portrait orientation) and score at 2 5/8 and then cut at 5 1/4 piece (*keep the piece you cut off...will use later!)
- you now have the base of your box...cut up each of the tabs as you would for assembling any other box (the little 1/2" x 2 5/8" tab next to the tabs you've cut gets cut off)
- cut a piece of white card stock to 5 1/4 x 2 5/8 (this is for the back of the box that stands straight up)
- cut 4 pieces of dsp (patterned paper) at 2 3/8 x 2 3/8 and 3 more different ones at the same size (these are for decorating your box)
- now take the baked brown sugar piece you cut off and cut it down to 3 5/8 (by the 2 3/8 it already is in width)...then turn it and cut it in half (that will be at 1 5/8...it will end up scored on both ends at half an inch...these are your 2 inserts for in the box to hold the snowflakes:)
 
We decorated our pop up snowflake cards above with the Season of Style dsp.  The snowflakes are from the Festive Flurry bundle (with framelits!) and the other two stamped images come from That's the Ticket and Tags 4 You. 
 
It's a fun project and does fold flat so you could mail it in a 6 x 6 envelop.  Here's a link to one Monica did using flowers so you can see how this idea can be used beyond Christmas.

Friday, November 22, 2013

Clear Envelope Christmas Album - Stamp Club Project #1

This was the first project at last night's stamp club.  We made this little mini album using SU's clear envelopes for the pages to slip your photos in inside.  I've made albums with pages from clear envelopes before (there was even one in a tin back in 2008!)  This particular one was inspired by Josee Smuck (see here for her's...although mine looks completely different...the inside is the same idea).

The dimensions for the cardstock are:
Base 4 7/8 x 8 1/2 scored at 1/4 and 1 1/4
Cover 4 7/8 x 6 1/4

I used the Calm Christmas stampset to decorate the album.  The dove is stamped in gold and 'peace on earth' is stamped in espresso.  The background for this focal point was also stamped first with the dictrionary background stamp.  The cover was embellished by running the cherry cobbler piece through the big shot with the pretty print embossing folder.  The patterned paper comes from the Season of Style dsp pack and we also used some of the crumbcake washi tape from the Epic Day assortment.  The album was fastened together by punching two holes in the spine with the cropadile and then lacing some cherry cobbler seam binding through and tying a bow.

Wednesday, November 20, 2013

Holiday Sale

The Holiday Sale (formerly called 'Online Extravaganza') starts today and only runs to December 2nd.  Visit my website to shop online or contact me to place an order!  Here's a link to the Holiday Sale Flyer!!!  I just can't believe how many wonderful things are on sale!!!  So many framelits, stamps, embellishments and more!!!!!!!!!!!!!!!!!!!!!!!!

Saturday, November 16, 2013

Festive Flurry Kit!

Here's a little video to show what comes in the *new Festive Flurries Kit.  You can make 10 of these awesome snowflakes as shown in the picture above...you can use them to decorate your home as a garland or tree ornaments or you can use them as bag or tag toppers or even on cards or boxes.
 
You can order yours online at this link or by contacting me.  The price per kit is just $17.95!
 
If 3 or more people are interested, I can set up a date in early December to make some of these awesome snowflakes together...all you have to do is purchase the kit and indicate your interest to me and I'll let you know what date I set it up for.
 
If you do place an online order, please use the following hostess code which is effective til Thursday November 21st!  Thanks:)
HOSTESS CODE:  V9XTGXGS
 

Christmas Card Idea using Postcard Background Stamp

I playing around with a Christmas card idea I had using the Postcard background stamp as a base.  I really *love* the Calm Christmas stampset in this year's holiday catalog and so it was used to stamp the other main images.  The stamp in the corner though comes from the Postage Collection set (a hostess set...used for the border) and then the 'merry' comes from Pennant Parade.


Thursday, November 14, 2013

Anniversary Card

Sorry for the long absence...my husband & I had gone on a trip for our anniversary and when we came back we were fighting colds and then there was this conference I was working and then my work in my day job got really busy.  I have been creating a bit, but not finding time to post.  So today I will start to remedy that....

This is the anniversary card I made for my husband this year.  Our 11th anniversary was November 7th.  I used several stamp sets on this card including:  the Postcard background stamp, Notable Notions, Postage Due and Ciao Baby (which was in last year's occasions mini).  I also used my circle punches, the little label punch & the postage punch.  The color combo on this one is:  cherry cobbler, island indigo, coastal caba and pool party.

Wednesday, October 23, 2013

Envelope Punchboard File Folder Card & Gift Card Holder!

 
This is my version of the file folder card that so many are trying out with the new envelope punch board.  It is one of the options for my next stamp club...I've made 3 or 4 options so I'm having a hard time choosing.  Because many people ask me for ideas for gift cards, I wanted to share this idea with you.  As you can see, I embellished with the festive flurries bundle (a bit of an addiction these days).  The file folder card shape is cinched together and the pocket it creates includes both a tag using Chalk Talk (don't you think this works well when stamped in cherry cobbler for Christmas?!) and a gift card envelope which I also made with the envelope punchboard.  These cards would also be ideal this Christmas for those who send a family photo or a family letter in their Christmas card...the possibilities are endless.

If you want to get a basic sense of how to make a file folder card with the envelop punchboard, here's a link to Catherine Pooler who has a video on it (though there are lots of versions out there).

Sunday, October 20, 2013

Festive Flurry Banner - a different kind of banner

So I didn't have great lighting for this photo and I don't have any of my Christmas stuff out yet to really give it effect, but I'm thrilled with how this idea turned out.  As you can see, I'm still playing with the festive flurry bundle.  And if you've been following my blog long you know that I love to make banners for holidays & occasions but this time I thought I'd made a wall banner that hangs down instead of across...and each element of the banner has a snowflake as it's base.  So  stamped and layered snowlfakes to my hearts content and then I strung them on some cherry cobbler seem binding.  I cut the JOY letters out of red glitter paper using the big shot, and the embellishments on the snowflakes in between the letters were actually in color accents that I embossed in gold (they were originally crisp cantaloupe, but you'd never know that now...see you can repurpose or remake anything to your suiting;)

Friday, October 18, 2013

Festive Flurry Bundle - Ornament Idea #2

Here's another ornament idea I've tried with the festive flurry bundle.  This one is made from 3 different sizes of the snowflakes each stamped in a different color (cherry cobbler, gumball green & gold)...then I layered them together (folding each in half first) and assembled similar to how I did yesterday's ornament.  I bet that gold will catch the light of the Christmas tree well:)

Thursday, October 17, 2013

Festive Flurry Bundle - Ornament Idea #1

I can't seem to get enough of stamping snowflakes with the new festive flurry stamp set, and cutting them out is a cinch with the coordinating framelits.  This ornament was made from five of the large snowflakes stamped in cherry cobbler and cut out...then I folded each one in half and punched a half circle out...then I glued them together and before I closed up the last snowflake the first one, I strung some of the new silver ribbon down and made a little dangle to hang in the punched circles out of some glitter paper punched five times with the small heart punch.  Now that I have the basic idea, I want to try with some other snowflake sizes, I think the next size down might be easier for folding purposes than this one was, and I wonder what else I could dangle in the 1 1/4" circle the ornament creates?!:)

Tuesday, October 15, 2013

Envelope Punchboard - Gift Card Holder, Thank You Card

 
I made this card using the envelope punchboard to get the file folder shapes in the pocked and the gift card insert.  Again, I was playing around with ideas which is why the colour pallet ended up being rather neutral.  I used the shop around roller stamp for the pocket and the greeting comes from one of the paper pumpkin kits from a past month.  I decorated the pocket with a dress from which I cut from black card stock using the dress up framelits, and I embellished it with a pressed clay flower that I made using the medium mold.  The dsp came from the in colour stack.

Monday, October 14, 2013

Mosaic Madness Christmas

While I was playing outside of the box on the weekend, I pulled out my Mosaic Madness stamp set and punch and paired it with the Sweet Essentials greetings and came up with this ornament Christmas card idea.  I love it when you get a lot of mileage out of a stampset and I love to find ways to use good basic supplies and stamps for any occasion and that is exactly what happened here.  I've been experimenting with making ornaments out of snowflakes (using the festive flurries bundle...see more thoughts/ideas on that in the days to come on this blog:)....and as I was experimenting I started looking at the idea of folding and combining symmetrical images to create ornaments...and from there these ornaments made with Mosaic Madness were born.  And an ornament needs a ribbon and a string don't you think?!  I think it turned out pretty cute, though if I had it to do again I would stamp the green background piece before forming the ornaments onto it, but since I was experimenting at the time, I didn't know where I was going, and I thought I'd just share with you the raw idea.  If you try it yourself, please let me know...I'd love to see what you come up with too!:)

Sunday, October 13, 2013

Vintage Christmas - a new colour palette

The colours for this Christmas card see at first very non-traditional, but I was inspired by some vintage Christmas ornaments...see this link!  In fact, it isn't non-traditional at all to use pinks and turquoise along with golds  in vintage Christmas vingette's at all.  I'm not thrilled with the final version of this card...I think it needs to be shiny-er.  It's prettier in person that the picture captures, but I feel like I could have pushed it just a bit further, but that is all part of the process...we create...and we re-create...and things evolve and take a life of their own.

I'm probably more of a red & green girl at Christmas, but it's far enough away to experiment and create outside of the box a bit;)

Stamp sets used on this card were:  Calm Christmas & World Map

Saturday, October 12, 2013

Up-cycle your old Holiday & Occasions Catalogs!

I made this little Halloween gift bag from pages from last year's holiday catalog.  I saw the idea to upcycle them from another demonstrator and then today I came upon this video from yet another demonstrator that makes it very easy, so I thought I'd share the link here.  My tag was made with the Tags 4 You stamp set & coordinating punch.

Monday, October 07, 2013

Pop & Place

Here's a preview:

Sunday, October 06, 2013


Stampin Up's new Pop & Place Holiday Gift Tags come in a booklet of 70+ tags in five designs--created from our existing punch and die shapes. These tags (which coordinate with the Season of Style products in the 2013 holiday catalog) are perfect for anyone wanting to make cute quick tags, even for new customers who may not know what punch or die shapes they are interested in just yet:) 

There are a few different options to choose from depending on your needs:
ItemDescription
134975Pop & Place Holiday Gift Tags Book   $11.95
134623Christmas Tagables Photopolymer Stamp Set  $16.95
 
135921


Pop & Place Holiday Gift Tags Bundle includes   $22.95
  • Pop & Place Holiday Gift Tags Book 
  • Christmas Tagables Photopolymer Stamp Set


135290


Pop & Place Holiday Gift Tags Starter Bundle includes  $27.95
  • Pop & Place Holiday Gift Tags Book 
  • Christmas Tagables Photopolymer Stamp Set
  • Soft Suede Classic Stampin' Spot
      • Clear Block C                                                                  

Saturday, October 05, 2013

World Card Making Day!

Today is World Card Making Day, and so you know I had to make a card, or two...  Actually, I have a number of other responsibilities today, so I didn't have the time to create all the things in my head, but I did sit down to make this card today to send to some wonderful friend who are going through a difficult time. 
 
So this is today's card (got some inspiration from Monica Vale:)  On this card I used the following stamp sets:  Layered Labels, Blessings from Heaven & Feeling Sentimental (I also used one of the single stamps from the first Paper Pumpkin kit).  The dsp comes from the Modern Medley pack (and the coordinating envelope was made from paper in the in color dsp stack).  In colors were Baked Brown Sugar & Basic Black.

I'd love to see what cards you made on world cardmaking day so be sure to post a link in the comments below or share with me on Facebook:)

Thursday, September 26, 2013

Playing around with Christmas Card Ideas for this Year!

I made about 6 prototypes of what I'll send as our family Christmas card this year and this is my favourite so far.  I used the new script embossing folder along with the Calm Christmas stampset.  Also the background of the focal point was made using the Dictionary background stamp & the this & that rotary stamp.  I also used the new Christmas washi tape on this card.

Tuesday, September 24, 2013

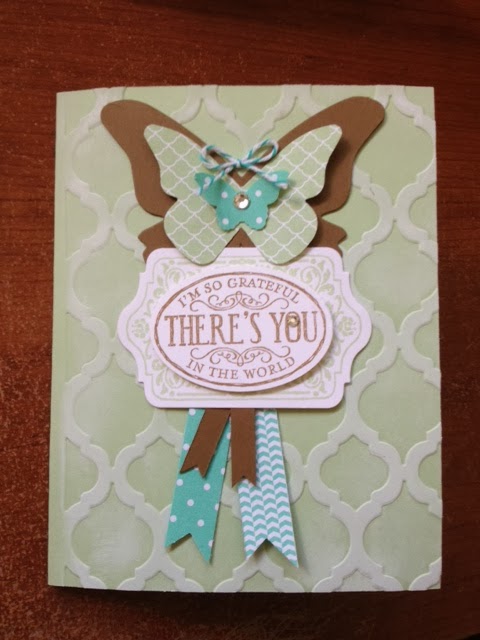
Chalk Talk Butterfly Card


I made this card recently using the Chalk Talk stamp set and coordinating framelits.  I also used the butterfly dies for the big shot AND the itty bitty butterfly punch that is on special this month.  The dsp comes from the in colours stack, and the base of the card is a piece of pistaccio pudding cardstock embossed with the mosaic folder and then inked with some craft white ink.

Monday, September 23, 2013

Notable Notions Anniversary Card

I made this card for my aunt & uncle's 50th anniversary last month.  The numbers were cut out of the gold glimmer paper with the big shot dies.  The stamped images come from the Notable Notions Stamp Set along with the Apothecary Accents one and the greeting comes from Itty Bitty Banners.

The butterfly is one of the images in the Papillon Potpouri stampset and it was punched with the coordinating punch.  The punch & stampset are on special this month as a bundle for 15% off!

The card was finished off with some baked brown sugar ruffled trim and some of the simply pressed clay flowers.