Thursday, May 22, 2014

Time for some new colours! - Introducing Hello Honey!

Today's project is a little treat pouch made out of some a new dsp pack that will be in the new catalog that starts on June 2nd called Moonlight....and it feature one of the new in colors that starts with that catalog, Hello Honey...I love it!  It's warm & rich...I've actually been looking for a cardigan in that colour for some time now...maybe since it's an 'in colour' I'll see it in stores more!;)

The project is embellished with the fun clips that are retiring from the new ctalog, but everything else is sticking around...like the scalloped tag topper punch that I used on the topper, the petite petals bundle that I used to embellish the topper and the stampsets That's the Ticket & Itty Bitty Banners that I used for the tag that I punched out with the tag duo punch on the bottom.

Tuesday, May 20, 2014

Retiring DSP Feature - Afternoon Picnic

I made this little lidded box out of some basic grey cardstock and decorated with the lovely afternoon picnic dsp that is retiring.  As you know I'm addicted to making roses with the Spiral Flower die (see recent posts!), and so I made 3 in coordinating colors that worked with this dsp for this project (wisteria wonder, coastal cabana & basic grey),  I also made a little tag with the Occasions Alphabet stampset that is retiring and punched it out with the ticket punch and adorned it with a bitty flower from the itty bitty punch pack that is retiring.

Monday, May 19, 2014

Retiring DSP Feature - Lidded Milk Carton

The other day as I told you I was inspired by Sam Donald as I was playing with using up some of my dsp, well, then I saw this adorable project and I knew I had to make my own.  This time I followed her formula to a 't' and got the darling boxes I'm posting today:)  I will admit this one is a bit trickly particularly the lid, but the result is cute and I like how easy it is to get into the box:)

The above one was made with the Afternoon Picnic dsp that is retiring  & I embellished with the Petite Petals bundle (stamps and punch), the 'for you' greeting from 'Itty Bitty Banners' & some flowers from the itty bitty punch pack which is retiring.  The wisteria wonder ribbon I used on the bottom is already retired, but I have seen some on the clearance rack not too long ago if you're looking for it.

The version of the box above is made the same way as the one at the top of the post except I used the Soho Subway retiring dsp and some summer starfruit card stock (a color that is also retiring).  The flowers come from the Petite Petals bundle and are embellished with the retiring dalias accents. 

Sunday, May 18, 2014

Retiring DSP Feature - More Modern Medley's

This adorable milk carton box is about 1 1/2" x 1 1/2" in the cubed area and would be cute for a chocolate or for a pot of lip balm etc.  I got the idea from Pootles when I was looking up dimensions for yesterday's project...It's almost done the same as this project of hers, so go to that link if you want to make one too!:)

I used the Petite Petals stampset & coordinating punch to decorate & more of that retiring baked brown sugar stretch trim.  Also the little bitty flower come from the punch pack that is also retiring...I don't plan to retire mine however, they're too sweet!

Saturday, May 17, 2014

Retiring DSP Feature - How many gift bags/boxes can you make from a piece of DSP?

So this week, I'm going to feature some projects using designer series paper (DSP).  There are quite a few packs retiring at the end of May, and I determined a number of years ago not to be a hoarder, which for me means, **I  have to use my supplies, so if I want the new paper coming out in the new catty, I have to use the paper I have, so I can get the new stuff!;)  That might be just me...and after playing with the Modern Medley pack for this project, I'm tempted to buy more of it because it's just so  beautiful, so I want to continue to play with it for a long time even though it is retiring, *but in order to buy more, I must be using up my stash, so that's what I'm doing;)

Today I was inspired by Sam Donald to see if I could get 3 bags/boxes out of my dsp and these projects were inspired by her.  I believe she's gotten as many as 5 bags/boxes out of one piece of dsp...see her cute tutorial here.

What I used:
- 1 12 x 12 sheet Modern Medley dsp...I cut one strip at 4 x 12 to make the small box (score in landscape at 4.75, 5,75, 10.5 & 11.5; score in portrait at 1")...then I cut an 8 x 8 out of the remainder to make one of the bags (score in landscape at 1 7/8, 3.75, 5 5/8 & 7 1/2; turn and score in portrait at 1 17/8 & 7 1/2" ...thanks to Sam for the measurements...I  wasn't figuring out the 1/8ths on this one!)  and then made the other bag out of the remaining 4 x 8 piece  (score in landscape at 1, 3.5, 4.5, 7; turn and score in portrait at 1")
- I tied the bags shut  (and dolled up the box too) with the adorable baked brown sugar gathered stretch trim which is retiring
- Stamps used come from the set 'A Fitting Occasion' which is a real 'go to' set for me.

Sunday, May 11, 2014

Club Project #2 This Month - Amazing Family Quilted Cards

Our second project his month was this quilted card.  Here is the process to create a quilted effect on the card:
- first punch squares of dsp (in my case, I used the Fresh Prints DSP paper stack).  I punched 4 squares of 4 different patters to achieve the effect above.
- then lay them out on your cardstock base, leaving the odd square blank/white (this makes all the difference when you quilt it!).  I find it works the best when I start in a diagonal line from the left corner to the right (perfectly vertical/horizontal can achieve a less authentic effect).  I was going for a patchwork effect:)
- then glue your squares down one you are happy with the layout
- trim any squares hanging over your card base
- emboss the card front.  I pulled out several of my embossing folders for club to use.  The most popular for this project were:  arrows textured and mosaic madness.
- stamp & embellish with a greeting!  The greeting above came from the Amazing Family stamp set which is sadly retiring.  I really luv this set as it is so versatile.  I did 'amazing mother' above as it's mother's day was coming up (and is in fact the day I chose to post this project...happy mother's day ladies!!)  Below you can see, that I did several of them too with 'amazing friend'.
 
Be sure to let me know I you decide to make a quilted card too!:))  I'd love to see:)

Saturday, May 10, 2014

May Club Project #1 - Out of the Salt Shaker...Paper Roses

The first project I taught at this month's stampin club was this little bouquet of paper roses.  We made each of the roses using the spiral flower die and then attached them to a wire stem using a small flower I cut using the fun flowers die.  We punched a whole in the small flowers that I cut in old olive (as I ran out of gumball green...all of the retiring color cardstock seems to be sold out already!).  Then we punched a small hole in the middle and fed the wire through, bent 1/4" of it over at a 90 degree angle and adhered everything with glue dots.  It's just that simple!  Did I mention the rose is adhered with only glue dots too...each rose takes exactly 3 glue dots, that's it!!

The stems were then arranged in salt shakers, which is an idea I saw on pinterest.  I thought is was a genius way to help give the little bouquets structure, and I bought these salt shakers very reasonably at the dollar store.  We actually used the pepper shaker in club and I set the matching salt shaker home with each member to create something else with!
We finished off the project by embellishing with some retiring gumball green satin ribbon and a tag that was stamped in raspberry ripple (retiring) with an image from the Four Frames stampset and punched with the coordinating label punch.  Then we stamped in gumball green (retiring) either 'x is extra that's how special you are' or 'y is for you that's who this is for'.  Both of these images come from the Occasions Alphabet stampset that is also retiring.  We punched this image out with the large oval punch and popped it up on the frame with a dimensional.

Saturday, May 03, 2014

April's Paper Pumpkin...*new* Prepaid Paper Pumpkin Subscriptions!...& Retiring Products Reminder!

I squealed when I opened this month's paper pumpkin...loved the project...a framable piece complete with frame & wrapping (in case you wanted to give it away for say mother's day or something;)  and supplies to make a ton of tags too:)

I didn't love the colours, I'll admit...a little tired of peachy tones, but no worries, I pulled out my stash and grabbed some real red coordinations card stock and my hearts a flutter framelits and created the darling heart you see above:)  That's one of the things I love about Paper Pumpkin, you can make them the way they come or do your own thing:)

BTW Paper Pumpkin can now be ordered as a subscription, meaning that you can prepay and order 1, 3, 6 or 12 months at a time and if you use the codes below hostess benefit is available too!  So you can subscribe for 3 months say using this method at your friend's workshop and it can add to their hostess benefit OR you can subscribe for say a whole year and since the amount is over the $200 minimum for hostess benefit, you can do it as your own workshop (contact me and I'll help you out if you want to see how, but it can even be done in an online order) and you'll earn a minimum of $35 of free products of your choice for yourself! Plus (as below) you'll be saving money on your Paper Pumpkin subscription too!!:)

Item#s -  Paper Pumpkin Prepaid Subscription Price (Shipping Included)
137858 1 month $24.95
137859 3 months $74.85
137860 6 months $143.70 -- save $1 per month
137861 12 months $275.40 -- save $2 per month

Paper Pumpkin also makes a great gift, so you can give it as a gift subscription to someone for their birthday or mother's day or just because:)

If you're a current Paper Pumpkin subscriber, this works for you too!  When you place your order for a prepaid subscription, you'll receive an email with a code that you simply redeem on mypaperpumpkin.com!  You can only redeem one code at a time, so if you were to buy or receive 2 subscriptions, you would load them consecutively.

Also, I'm just reposting the retiring lists because many items are selling out.  The lists at the links below are updated daily for items that are sold out.
- retiring stamps
- retiring accessories
If you are placing an online order and would like my current hostess code, it is:  UAVFZRVH

Monday, April 21, 2014

Saying Good-bye to Some of My Favourites!

When the retiring product lists came out this morning, I was sad to see some of my all-time favourite stampsets and accessories on the list.  So I thought I'd give you a list of the retiring items I'm going to miss the very most.  These are things I consider to be timeless and oh so versatile...I turn to them time and again!...

1.  LAYERED LABELS
The reason this set is #1 on my list is the largest image in the set...the 'heartfelt' image.  I have used this on countless projects, a sample of which I've included below.  I think it's one of my favourite all-time stamps and it makes everything work for me. If you scroll down a couple posts on this blog, you'll see I also used this set on the KISS cards at my last stamp club...I love the swirl-y-ness!
Another reason I love this set is that every image in it coordinates with a framelit and many of the images also coordinate with a punch...now that makes for quick creating!!
 
2.  AMAZING FAMILY
This is another stampset that is SO versatile, and it's not just for family members, it also has a friend stamp.  I just love the font!!  It's great for chalkboard stamping, or embossing or just about anything you can think of!

3.  EX LIBRIS
This one is a background stamp, and, yes, it looks like a bookfront, but you can do so many different looks with it.  I love the old school vintage feel of this stamp.

Below is a project I made last summer with it, I'll also highlight the fact that this project also uses the butterflies Bigz die that is also retiring!

The little CREATE journal below pairs Ex Libris with Creative Elements (#4 on my list of favourite sets retiring below).

4.  CREATIVE ELEMENTS
This next stamp set is a favourite because it goes with anything...the swirly large stamp in the set is literally in so many of the backgrounds to my cards, that I don't dare count.  If you were to check out my April 17th post below, you'll see it again there.  Below is a project I did when it first came out, a gratitude journal we made at that year's catalog launch workshop.  I still have one of these right beside where I work.  I'll also highlight that that delightful oval frame on the project below is from the frames embossing folders that are also retiring.
Just look at this little pin cushion I made with images from Creative Elements, still one of my favourite things I've made:)
 
This delightful banner below hangs on my craft racks where my punches also hang to this very day and it was also stamped with the CREATE image from the creative elements set.  The flower was made from the Fun Flowers die that are also retiring (I also made the wreath just posted below as well on my blog with that die...and the Fun Flowers Die is #5 on my list below).  The other dies used in the banner below are the Bigz pennant dies, which will also be retiring.  Say it isn't so?!!

 
5.  FUN FLOWERS BIGZ DIE
I know a die is not a stamp set, but I have loved this die.  I used it most recently on the wreath just a couple of posts below this on on my blog (incidently I also used the Morning Post alphabet stampset in that project with is also retiring).  Here is a link.

Back to fun flowers though, below is the card box that sits in my craft room, where I store all my extras and it is adorned with this big beautiful flower I made with layers and layers of fun flowers.  No, I could not be without this die!  Love it!!
I made a multitude of bookmarks (ribbon bookmarks) with this die too, like the lovely one in wisteria below!

6. FRAMED TULIPS
Also not a stampset, but the framed tulips embossing folder is next on my list...here are 2 of my favourite cards I made with it...love the effect on a card!!

7.  DRESS UP FRAMELITS
I, frankly, think SU is going to regret retiring these adorable and versatile framelits, I've used them on cards, scrapbook pages, and even 3D items, like the one below that still adorns one of my shelves:)
Or, how about this bday card on embossed tinfoil?!
 
8.  HEARTS A FLUTTER
What a sweet stampset this one is and perfect for borders (so trendy!).  I've used this one on everything from valentines to birthday cards to whiteboards to baby cards...vers-a-tile!


 9.  LOVELY LITTLE LABELS
It's in the little things...this one may not stand out as a focal point on many of my projects but it's there, usually as the perfect little tag...and some of the images even have postage and vintage charm:)  See the little 'sweet' label framed and stamped with this stamp set:)
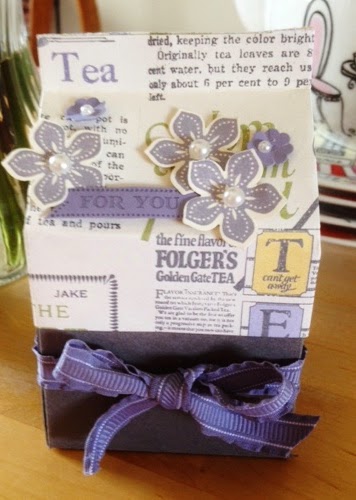
10.  FABULOUS PHRASES
Another stamp set that you'll be hard pressed to see as the focal point in the project, but it's always there with the perfect word or label or accent.  Love the font too!  This stampset is where the word 'friend's came from in March's double pocket card - see link here.
It's also where the greeting I used on this little box below that I haven't posted before came from.  I made this boxes to hold lip glosses to give to co-workers who've been helpful from a Pootles tutorial, didn't they turn out darling?!

Well I've made it to 10, but I realize I'm not nearly done, here are some other retiring products that I believe are top 10 worthy...if I have time, another day, I'll add links/photos of projects where I used them:
- Two frames embossing folder (used in creative elements gratitude journal above)
- Occasions  Alphabet stampset...truly something in here for every occasion!
- Morning Post alphabet stampset...love the script in each of the letters!
- Stampin Wheels!  So many of them, but my very favourite are:
    Music Notes
    Travel Journal
    Viola's Lace
    Shop Around
    Very Vintage
- Blessings from Heaven - the sentiment in card #1 above comes from this; oh, and can't resist this one either:
- Sweet Essentials - I use these sayings/greeting on everything...just look at my April club KISS cards...the 'thinking of you' comes from this set!
- Boutique Details  - the lovely in color embellies that came out last summer!
- Vintage Trinkets...oh these are used all over my blog on projects, what will I use din their place?!
- Stitched Satin ribbon in the retiring in colors...the retiring in colors were gorgeous and I will especially miss the raspberry ripple and this ribbon which ties like a dream!
- Ruffle Stretch Trim...this one's in the current in colors, how can it  be retiring already, I'm still in luv with it?!
- Beautiful Butterflies Bigz die!!!!!!
- Postage Collection Hostess set...oh but I luv it...ok, here's a reminder...
- Scallop Edge Border...that MUST be a typo on the retiring list, no?!
- Itty Bitty Shapes punch pack...I will start a protest on this one!
- Modern Medley dsp
- Coordinations cardstock & the sanding system...you surely have seen the beautiful roses one can create with this, surely they've gone mad at SU if this is on the list?!


Sunday, April 20, 2014

FREE SHIPPING!!!!!! **Starts Today!! April 21 - 25, 2014 ONLY!

The SU retirement list came out this morning...here is a link to the pdf of retiring stamps and retiring accessories:
Retiring stamps
Retiring accessories

Items are only available while quantities last!!

Also, from April 21 - 25, 2014 SU is offering FREE shipping on ALL orders.  Here is a link to my online store for you to place your order from the retiring list (just click 'SHOP' in the upper right corner of the link and away you go!).  You can shop from clearance products, from the occasions catalog, from MDS, from anything you wish - no matter how small!! 

Friday, April 18, 2014

Burlap & Blooms - My Way!

So this is my version of the Burlap & Blooms wreath in the spring occasions catalog.  I made the flowers using the Fun Flowers die and the new spiral flower die.  Cardstock colours I used on this project were Raspberry Ripple and Primrose Petals (which are both about to retire) and Pool Party.  I know it looks completely different than the one in the occasions catalog, but those colours were just now me, still the Burlap & Blooms kit was a great value to me  and I love working with the Burlap so much!  Also, the letters I used for the banner were stamped with the Morning Post stamp set and the banner pieces were cutout with the banner framelits.

Thursday, April 17, 2014

Card Set & Box - Trust God

This is a set of 8 cards and coordinating envelopes & box I recently made for a friend in Ministry.  I used a real combination of stamp sets including:  the dove from Calm Christmas, the swirls from Creative Elements and the greetings from Trust God. 

Friday, April 11, 2014

April Club Projects! - KISS Cards & Envelope Punchboard Cardbox

 For my April club, I wanted to show my stampin ladies how to make a card box with the Envelope punchboard, if you make a cardbox, you know you've got to fill it with cards, so I decided we'd make a set to fill our boxes.  Normally at club we make one 3D item and one card, but if I made this card set to be as complicated as the individual cards we normally make, I knew we'd never get done in an evening, so I decided to introduce club to KISS cards...Keep It Simple Stamper.

 
Above is the cardbox we made with the Envelope Punchboard.  We used the Afternoon Picnic DSP that is going to retire at the end of May.  We also used the Papillon Potpourri stampset and coordinating punch as well as several other punches (blossom, 2 1/2 circle and 1' circle) and the Lovely Little Labels stampset and coordinating punch.
 
Instructions for making the box:
Base - 9 1/4 x 9 1/4
First score 3 5/8
Second score 4 5/8
Then line up score lines as you turn the box and score & punch the other 3 sides
 
Rule of Thumb for making these boxes ** You can make them for any envelope size on punch board just increase the size of the paper by 1 1/4" (both height & width) & increase first score by 1/8" and do second score an inch from there
Above is the KISS card I came up with for the card set and coordinating envelopes for this project.  We used the Layered Labels, Notable Notions, Papillon Potpourri and Sweet Essentials stamp sets to create this cards with inks in:  wisteria wonder, coastal cabana, basic grey & smokey slate.

The idea behind a KISS card is to keep to a few layers.  Right now a tone on tone matting is on trend.  Also, do each step for all cards at once before going on to the next step.  Here are the dimensions for this particular set:

Base 5 1/2 x 8 1/2; score at 4 1/4
Insert 4 x 5 1/4...you'll get 4 out of one sheet of cardstock along with 2 pieces that are 1/2 x 4 and one long 1/2 x 4 for your sentiments...cut all at once
Do every step for all 4 then move on...saves time

Sunday, April 06, 2014

Shadow Box

Ok, I confess that I did not use all SU supplies for today's project.  I had this 6x6 pad of designer paper from My Mind's Eye called Lost & Found Two and it's just so me & soooo pretty...and here it had been sitting unused for quite sometime, so when I sat down to make today's shadow box, I couldn't resist using this beautiful sheet with the Eiffel Tower on it as the recessed piece in this project.  All other supplies are SU including the coastal cabana base, the baked brown sugar gathered trim & the real red and primrose petals coordinations cardstock I used together wit the rosette bigz die to get that lovely rose.  Inspiration for this project came from Sam at Pootles, such a clever girl!  Sam is in the UK and so if you are in the UK and looking for a SU demonstrator, please look Sam up...she is a doll!

Saturday, April 05, 2014

Storage Solutions...storing Markers & Re-inkers!

I came across some great ideas for storage of markers & re-inkers this week.  If you click on the words 'markers' and 'reinkers' you will find the youtube videos, thanks to Sam Donald (clever, clever girl!:)  I adapted my marker one (below) to fit my space and purposes by basically making 3 triangle boxes and affixing them.  Each is made out of a piece of 7 1/4 x 7 1/4" paper. By having a 3 triangle configuration I think I'll be able to have of them on either end o the shelf I'll use them on.   I made mine in raspberry ripple cardstock and embellished with some soho subway dsp (and some retired striped grosgrain).

And below you will see that I made some caddies to store my rinkers (previously I kept them in a basket, but I liked this idea...improvised out of a lipstick storage box).  The base for these was made with Early Espresso cardstock and, once again, I used soho subway dsp to embellish..and this time a little summer starfruit stitched satin ribbon.


Friday, April 04, 2014

Business Card Holder

 
I needed a new business card holder, well 2 really...one for my desk at work and one for my volunteer position, at which I'm working an event this weekend and wanted to have my cards on my feature table, so a holder was in order to keep them in place!

I kept making a fairly wobbly version until I stumbled upon Sam's tutorial here.  Sam is in the UK and is so clever at these things & she thought to add feet to the box - brilliant!!  I adapted her box slightly as my tools work in imperial (rather than metric), so here are the dimensions that I used in mine:
Cardstock base 6 x 7.5″
Score at 1.5, 2.25, 4.75 and 5.5″ (on long side)
Score at 1 and 5″ (on short side)
And here's a link to Sam's video where she makes her metric version.

For my box, I used basic black cardstock & modern medley dsp.  I also used the rosettle bigz die from the Occasions catalog and 2 pieces of coordinations cardstock, one in primrose petals & one in real red, to make my flower embellishment.  I *luv* making these flowers/roses...must be the 'roses in my heart' I guess;)

Sunday, March 30, 2014

6 Sided, Votive Holder Box

Many thanks to Sam Donald, a lovely UK demonstrator, for this clever idea!  This adorable little box fits 4 votive candles!!  I made it out of the darling SAB designer series paper you can earn for free through March 31 (contact me if you don't want to miss it!)...and I also embellished with the lovely twine that you can also earn for free...The stamped images come from the Lovely Little Labels stamp set (and the coordinating punch pack).

Saturday, March 29, 2014

Good as Gold - SAB Card Kit...or is it a treat bag kit?!

Just thought I'd show you what I did with one of the notecards in the Good as Gold card kit you can earn for free during SAB (which ends on March 31st!  Oh no...coming so soon!!!).  I love this little kit & especially the gold accents!

Club Projects & Sale-a-bration

I know I've been blog-absent a lot lately...busy at the day-job...been doing a fair bit of creating though, just not finding the time to photograph it and blog about it....  I thought I better catch you up on some of my March club projects.  We used as many SAB products as possible and I wanted to remind you that SAB is almost over.  It ends on March 31st!  So hurry and contact me with your order if you don't want to miss out on the FREE goodies like the DSP used on today's projects!

Below are the file folder cards we made at my SAB club in March.  The design utilizes the envelope punchboard and the Film Framelits which are darling!  Stamped images come from Perfect Pennats (below) and  a previous Paper Pumpkin (for 'the good life' stamp on the tab...sorry you can't see it well in the pic!)