

Tuesday, December 31, 2013
Label Love Birthday Card
Monday, December 30, 2013
Mini Journal - From my Heart

Friday, December 27, 2013
Burlap & Blooms Wreath Class

The new Occasions Catalog starts January 3rd! If you haven't received your copy and are in the Saskatoon area and would like one, be sure to contact me and we'll connect.
There are several wonderful simply created kits in the Occasions Catalog, and the Burlap & Blooms Wreath Kit caught my eye in particular, and I know that in January once the Christmas decorations are down I'm going to want to start thinking of new décor items, and maybe even spring, so I've ordered myself a kit and will be making it in January. As several of you have asked for a January event for us to get together, I thought I'd invite you to join me....
I will hold a Burlap & Blooms Wreath class on January 16th, 2014 at 7pm. If you'd like to attend, you will need to rsvp to me no later than January 2nd so I can order enough kits for everyone. If at all possible, I'd like to collect the class fee at that time, but if we have trouble connecting we'll work that out another way. The class fee is $27.50 (the cost of the burlap & Blooms Simply Created Wreath Kit in the upcoming catalog). If you'd like to add a silicon matt (as this project is glue gun intensive) to have one in your craft supplies (I know I will be using mine that day!), just say so when you email me to register for this class. Adding the silicon matt to your kit will bring your class fee to $35 (and if you're doing the math, you will realize that I have applied a 20% discount on the silicon matt...happy new year!)
What do you need to bring to the class:
- paper snips & adhesive
- glue gun if you have one (if not we can share)
- bone folder (if not we can share)
- paper piercer if you have one (if not, we can share)
Be sure to rsvp to me by Jan 2nd if you want to come as I want to make sure your kit arrives in time!!
Saturday, December 21, 2013
Ringlet Wreath

To make a wreath like this (and you can make one for any season...doesn't have to be Christmas...I might just have to make a spring one this year, I'm thinking;) all you need is:
- a 10-12" foam wreath
- 140 or so stick pins
- 6 sheets of double sided patterned designer series paper (cut into half inch strips)
- a bone folder (to curl each of the strips of dsp into ringlets)
- about 1.5 - 2 hrs to play & create:)
Wednesday, December 18, 2013
Gift Wrapping & Bows


Whether you use the Pretty Presents gift bows kit that's available in the holiday catalog or the new bows bigz die, also in the holiday catalog, these bows certainly make pretty impression on your parcels. As I was wrapping gifts this past weekend, I had so much fun making and adorning coordinating bows and tags:)
Tuesday, December 17, 2013
From Scraps to Gift Tags...


This weekend I looked at the scrap pile from all the cards, gifts and packaging I have been making and I turned those scraps into gift tags...we all need to replenish our gift tags this time of year...and I also made the little envelop box above to store the gift tags in. Leave me a comment if you'd like the dimensions and I'll add them, but it was simply made with the envelop punch board (*my new favourite tool!) and some left over snowflakes I'd made with the Festive Flurries bundle...simple! The tags pictures above are just a few that I made this weekend based on the stamps at hand...the Ornament stamps were stamped in versamark and embossed in white...the gold ones come from the ornament and last year's single snowflake stamp, embossed in gold...a little paper ribbon & dsp and voila...all kinds of tags:)
Another Gift-Wrapping Option...capped with a Pretty Bow:)

Sunday, December 15, 2013
Christmas Packaging & Decorating...with Snowflakes:)

Tuesday, December 10, 2013
Clearance Rack Bliz!
Thursday, December 05, 2013
Birthday Card for a Fabulous Lady...and envelope box

Do you ever have that happen, by the time you finish making a card for a friend, it doesn't fit into an ordinary envelope? That's why I love the envelope punch board...I made the coordinating envelope box for the card above in it:)
Today's card is a birthday card for a fabulous woman. I took the pictures in the evening so I'm sorry the lighting doesn't lend itself to a good image. I used the From My Heart stamp set for the main image and created several layers with it, cutting out the main piece with the apothecary accents framelits. I also used some Soho Subway DSP (and a bit of Modern Medley DSP too) and some of the in color ruffled trim & embellishments. The bow is made from crumbcake taffeta and a vintage button.

Sunday, December 01, 2013
Whole lot of LOVE!

Exclusive valentine, love and really any occasion are being released today and are only available until January 27th! I have an order going in today if you want anything, just contact me! Or you can always order online by clicking here!!:) Can you guess what's on MY order today from the list below?!!
The fine print: These are exclusive products that will not be available after the promotion. No limits on this promotion.
| Item | Description | Price |
| 131850 | Love You More Stamp Set (Wood)z | $26.95 |
| 131853 | Love You More Stamp Set (Clear) | $20.95 |
| 134611 | Follow My Heart Stamp Set (Wood) | $19.95 |
| 134614 | Follow My Heart Stamp Set (Clear) | $14.95 |
| 134617 | Flowerfull Heart Stamp (Wood) | $11.95 |
| 132862 | Toujours + d'amour (Clear) | $20.95 |
| Item | Description | Price | Includes |
| 134610 | Sweetheart Treat Bags | $6.95 | 12 heart sacks, 12 die-cut labels, 12 pre-cut pieces of Pool Party Baker's Twine |
| 132162 | Monster Hugs Boy | $7.95 | 18 boy monsters, 18 googly eyes, 18 adhesive hearts |
| 132163 | Monster Hugs Girl | $7.95 | 18 girl monsters, 18 googly eyes, 18 adhesive hearts |
| 134609 | Sweet Sayings Cards and Envelopes | $7.95 | 12 printed card bases, 12 envelopes (four Real Red, four Pool Party, four Crisp Cantaloupe) |
 Follow my heart - 14.95 C
 Love U More - 20.95 C
 Treat bags - 6.95
 Cards & envies - 7/95
Saturday, November 23, 2013
Pop Up Card...in a Box - Club Project #2

Rough dimensions & meaurements (in inches):
- start with a full piece of cardstock (baked brown sugar)...score (landscape) at 2 5/8, 5 1/4, 7 7/8 and 10 1/2
- turn (portrait orientation) and score at 2 5/8 and then cut at 5 1/4 piece (*keep the piece you cut off...will use later!)
- you now have the base of your box...cut up each of the tabs as you would for assembling any other box (the little 1/2" x 2 5/8" tab next to the tabs you've cut gets cut off)
- cut a piece of white card stock to 5 1/4 x 2 5/8 (this is for the back of the box that stands straight up)
- cut 4 pieces of dsp (patterned paper) at 2 3/8 x 2 3/8 and 3 more different ones at the same size (these are for decorating your box)
- now take the baked brown sugar piece you cut off and cut it down to 3 5/8 (by the 2 3/8 it already is in width)...then turn it and cut it in half (that will be at 1 5/8...it will end up scored on both ends at half an inch...these are your 2 inserts for in the box to hold the snowflakes:)
We decorated our pop up snowflake cards above with the Season of Style dsp. The snowflakes are from the Festive Flurry bundle (with framelits!) and the other two stamped images come from That's the Ticket and Tags 4 You.
It's a fun project and does fold flat so you could mail it in a 6 x 6 envelop. Here's a link to one Monica did using flowers so you can see how this idea can be used beyond Christmas.
Friday, November 22, 2013
Clear Envelope Christmas Album - Stamp Club Project #1

The dimensions for the cardstock are:
Base 4 7/8 x 8 1/2 scored at 1/4 and 1 1/4
Cover 4 7/8 x 6 1/4
I used the Calm Christmas stampset to decorate the album. The dove is stamped in gold and 'peace on earth' is stamped in espresso. The background for this focal point was also stamped first with the dictrionary background stamp. The cover was embellished by running the cherry cobbler piece through the big shot with the pretty print embossing folder. The patterned paper comes from the Season of Style dsp pack and we also used some of the crumbcake washi tape from the Epic Day assortment. The album was fastened together by punching two holes in the spine with the cropadile and then lacing some cherry cobbler seam binding through and tying a bow.
Wednesday, November 20, 2013
Holiday Sale

Saturday, November 16, 2013
Festive Flurry Kit!

Here's a little video to show what comes in the *new Festive Flurries Kit. You can make 10 of these awesome snowflakes as shown in the picture above...you can use them to decorate your home as a garland or tree ornaments or you can use them as bag or tag toppers or even on cards or boxes.
You can order yours online at this link or by contacting me. The price per kit is just $17.95!
If 3 or more people are interested, I can set up a date in early December to make some of these awesome snowflakes together...all you have to do is purchase the kit and indicate your interest to me and I'll let you know what date I set it up for.
If you do place an online order, please use the following hostess code which is effective til Thursday November 21st! Thanks:)
HOSTESS CODE: V9XTGXGS
Christmas Card Idea using Postcard Background Stamp

Thursday, November 14, 2013
Anniversary Card

This is the anniversary card I made for my husband this year. Our 11th anniversary was November 7th. I used several stamp sets on this card including: the Postcard background stamp, Notable Notions, Postage Due and Ciao Baby (which was in last year's occasions mini). I also used my circle punches, the little label punch & the postage punch. The color combo on this one is: cherry cobbler, island indigo, coastal caba and pool party.
Wednesday, October 23, 2013
Envelope Punchboard File Folder Card & Gift Card Holder!


If you want to get a basic sense of how to make a file folder card with the envelop punchboard, here's a link to Catherine Pooler who has a video on it (though there are lots of versions out there).
Sunday, October 20, 2013
Festive Flurry Banner - a different kind of banner

Friday, October 18, 2013
Festive Flurry Bundle - Ornament Idea #2

Thursday, October 17, 2013
Festive Flurry Bundle - Ornament Idea #1

Tuesday, October 15, 2013
Envelope Punchboard - Gift Card Holder, Thank You Card

Monday, October 14, 2013
Mosaic Madness Christmas

Sunday, October 13, 2013
Vintage Christmas - a new colour palette

I'm probably more of a red & green girl at Christmas, but it's far enough away to experiment and create outside of the box a bit;)
Stamp sets used on this card were: Calm Christmas & World Map
Saturday, October 12, 2013
Up-cycle your old Holiday & Occasions Catalogs!

Monday, October 07, 2013
Sunday, October 06, 2013

Stampin Up's new Pop & Place Holiday Gift Tags come in a booklet of 70+ tags in five designs--created from our existing punch and die shapes. These tags (which coordinate with the Season of Style products in the 2013 holiday catalog) are perfect for anyone wanting to make cute quick tags, even for new customers who may not know what punch or die shapes they are interested in just yet:)
There are a few different options to choose from depending on your needs:
| Item | Description | |
| 134975 | Pop & Place Holiday Gift Tags Book $11.95 | |
| 134623 | Christmas Tagables Photopolymer Stamp Set $16.95 | |
| 135921 | Pop & Place Holiday Gift Tags Bundle includes $22.95
| |
| 135290 | Pop & Place Holiday Gift Tags Starter Bundle includes $27.95
|
Saturday, October 05, 2013
World Card Making Day!
Today is World Card Making Day, and so you know I had to make a card, or two... Actually, I have a number of other responsibilities today, so I didn't have the time to create all the things in my head, but I did sit down to make this card today to send to some wonderful friend who are going through a difficult time.
 So this is today's card (got some inspiration from Monica Vale:) On this card I used the following stamp sets: Layered Labels, Blessings from Heaven & Feeling Sentimental (I also used one of the single stamps from the first Paper Pumpkin kit). The dsp comes from the Modern Medley pack (and the coordinating envelope was made from paper in the in color dsp stack). In colors were Baked Brown Sugar & Basic Black.
I'd love to see what cards you made on world cardmaking day so be sure to post a link in the comments below or share with me on Facebook:)

I'd love to see what cards you made on world cardmaking day so be sure to post a link in the comments below or share with me on Facebook:)
Thursday, September 26, 2013
Playing around with Christmas Card Ideas for this Year!

Tuesday, September 24, 2013
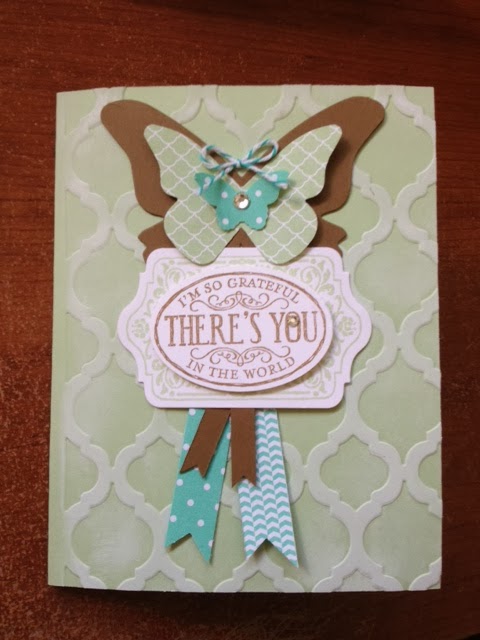
Chalk Talk Butterfly Card

Monday, September 23, 2013
Notable Notions Anniversary Card

The butterfly is one of the images in the Papillon Potpouri stampset and it was punched with the coordinating punch. The punch & stampset are on special this month as a bundle for 15% off!
The card was finished off with some baked brown sugar ruffled trim and some of the simply pressed clay flowers.
Sunday, September 22, 2013
Ribbon Jars - Chalk Talk


Friday, September 13, 2013
Club Project #2 - Thanksgiving Card

50 New Items on Clearance Rack & HOSTESS CODE

Here's a link to the new items LINK
ALSO, if you are placing an order online today or tomorrow, please use the following hostess code: UVYVRXSX
Thursday, September 12, 2013
Club Project #1 - Journal

I used the world map background stamp as the focal point for this journal and Postage Collection hostess set for the other images. I also used a Boutique Details embellishment in coastal caban on the bottom right and some of the striped chevron ribbon (love working with this!). The spine of the book was covered in Modern Medley dsp....and voila 'priceless dreams'!:)
Friday, September 06, 2013
Tags 4 You - Thanksgiving

Sunday, September 01, 2013
Brand New Today ** Envelope Punch Board

Tags 4 You - Treat or Treat!


I made this little 'treat' jar using the Tags 4 You stamp set from the Holiday catalog. The set has this image, a Christmas one, a thanksgiving one and a valentine's one - talk about an affordable way to hit the occasions that crafters often make cards, treats or gifts for! I used washi tape from the This or That line to trim the jar (see the calypso coral piece) and also some of the coordinating dsp on the bow. The black and vanilla dsp come from my new favourite Modern Medley dsp pack (love it!). Also the 'treat or treat' tag is popped up on an image I stamped using Chalk Talk (and cut out using the coordinating frameit). The button on the very top is from the Designer Very Vintage collection.
Subscribe to:
Posts (Atom)